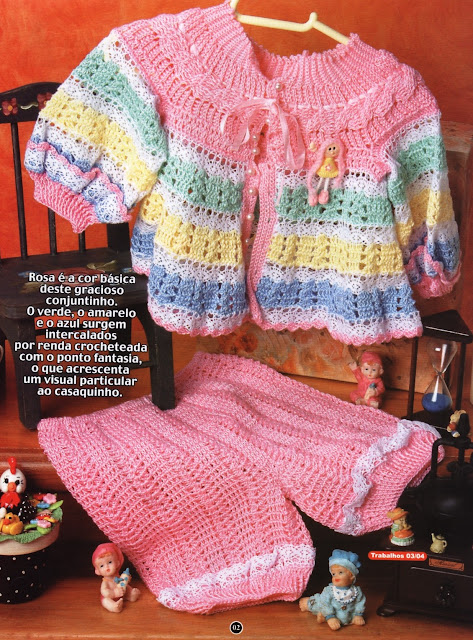
Nao tem a receita, tem apenas o grafico, mas achei tao lindo que resolvi postar pra voces...quem sabe alguem pode querer tentar fazer.

Achei esta gracinha no http://veraesuasmanualidades.blogspot.com.br/2011/08/grafico-para-vestido-e-casaquinho.html

ACHEI ESTE VIDEO QUE TALVEZ POSSA AJUDAR
http://youtu.be/dTb0e2DkuPg
http://youtu.be/x4jx1OkzXGA
http://youtu.be/T5qSD48tiIk

Crochet baby ripple sweater - RECEITA EM INGLES
Size: Infants to 6 months (TAM 6 MESES)
REQUIREMENTS:
YARN: 5-ounces of 3-ply Baby Yarn.
CROCHET HOOK: One # 3 Hook; One # 2 Steel Hook.
1 ball of silk for Trimming.
Starting at the neck: Chain 72 sts. Make 1 d c in 3rd st from hook, * 3 d c in next st; 1 d c in next 4 sts; repeat from * across row, ending with 3 d c in next st; 1 d c in last 2 sts. NOTE: Hereafter when working d c pick up the back loop of the sts and when increasing use both loops of the stitch on the row below. Ch 3, turn.
ROW 2: Skip 2 sts; 1 d c in next st; 5 d c in next st; 1 d c in next 2 sts ; * skip 2 sts, 1 d c in next 2 sts; 5 d c in next st; 1 d c in next 2 sts; repeat from * 12 times. Ch 3, turn. ROW 3: Skip 2 sts, 1 d c in next 2 sts; 3 d c in next st; 1 d c in next 3 sts; * skip 2 sts; 1 d c in next 3 sts; 3 d c in next st; 1 d c in next 3 sts; repeat from * 12 times. Chain 3, turn. ROW 4: Skip 2 sts, 1 d c in next 2 sts; 5 d c in next st; 1 d c in next 3 sts; * skip 2 sts; 1 d c in next 3 sts; 5 d c in next st; 1 d c in next 3 sts; repeat from * 12 times. Chain 3, turn. ROW 5: Skip 2 sts, 1 d c in next 3 sts; 3 d c in next st; 1 d c in next 4 sts; * skip 2 sts; 1 d c in next 4 sts; 3 d c in next st; 1 d c in next 4 sts; repeat from * 12 times. Chain 3, turn. ROW 6: Skip 2 sts; 1 d c in next 3 sts; 5 d c in next st; 1 d c in next 4 sts; * skip 2 sts; 1 d c in next 4 sts; 5 d c in next st; 1 d c in next 4 sts; repeat from * 12 times. Chain 3, turn. ROW 7: Skip 2 sts; 1 d c in next 4 sts; 3 d c in next st; 1 d c in next 5 sts; * skip 2 sts, 1 d c in next 5 sts; 3 d c in next st; 1 d c in next 5 sts; repeat from * 12 times. Chain 3, turn. ROW 8: Skip 2 sts; 1 d c in next 4 sts; 5 d c in next st; 1 d c in next 5 sts; * skip 2 sts; 1 d c in next 5 sts; 5 d c in next st; 1 d c in next 5 sts; repeat from * 12 times. Chain 3, turn. ROW 9: Skip 2 sts, 1 d c in next 5 sts; 3 d c in next st; 1 d c in next 6 sts; * skip 2 sts; 1 d c in next 6 sts; 3 d c in next st; 1 d c in next 6 sts; repeat from * 12 times. Chain 3, turn. ROW 10: Skip 2 sts, 1 d c in next 5 sts; 5 d c in next st; 1 d c in next 6 sts; * skip 2 sts; 1 d c in next 6 sts; 5 d c in next st; 1 d c in next 6 sts; repeat from * 12 times. Chain 3, turn.
ROW 11: SEPARATION: Skip 2 sts; 1 d c in next 6 sts; 3 d c in next st; 1 d c in next 7 sts; ** skip 2 sts; 1 d c in next 7 sts; 3 d c in next st; 1 d c in next 7 sts **; skip the next 3 patterns for the sleeve; repeat between **’s 4 times, this is for the back; skip the next 3 patterns for second sleeve; repeat between **’s twice. (Sleeves will be worked later). Chain 3, turn. ROW 12:Skip 2 sts; 1 d c in next 6 sts; 5 d c in next st; 1 d c in next 7 sts; * skip 2 sts; 1 d c in next 7 sts; 5 d c in next st; 1 d c in next 7 sts; repeat from * across row. Chain 3, turn. ROW 13: Work in the same way, but each pattern has: 1 d c in next 8 sts; 3 d c in next st; 1 d c in next 8 sts. Chain 3, turn. ROW 14: Work in the same way but each pattern has: 1 d c in next 8 sts ; 5 d c in next st, 1 d c in next 8 sts. Chain 3, and turn. ROW 15: Work in the same way but each pattern has: 1 d c in next 9 sts; 3 d c in next st; 1 d c in next 9 sts. Chain 3, turn. ROW 16: Work in the same way but each pattern has: 1 d c in next 9 sts; 5 d c in next st; 1 d c in next 9 sts. Chain 3, turn. ROW 17: Work in the same way but each pattern has: 1 d c in next 10 sts; 3 d c in next st; 1 d c in next 10 sts. (No increase) Chain 3, turn. ROW 18: Do as row 17. (No increase). ROW 19: Do as row 17. (No increase). ROW 20: Do as row 17. (No increase). Break yarn.
SLEEVES: Tie yarn at the 2nd d c at the underarm edge on the first pattern; chain 3 sts; 1 d c in next 6 sts; 3 d c in next st; 1 d c in next 7 sts; * skip 2 sts; 1 d c in next 7 sts; 3 de in next st; 1 d c in next 7 sts ; repeat from * once more. Chain 3, turn.ROW 2: Skip 2 sts; 1 d c in next 6 sts; 3 d c in next st; 1 d c in next 7 sts; * skip 2 sts; 1 d c in next 7 sts; 3 d c in next st; 1 d c in next 7 sts; repeat from * once more. Chain 3, turn. ROWS 3-4-5-6-7: Repeat row 2. Break yarn. Sew up sleeve.
BEADING AT NECK EDGE: Tie yarn at the neck edge; chain 4 sts; * skip 1 st; 1 d c in next st; chain 2, repeat from * around neck. Break yarn. TRIMMING: With a # 2 steel hook and using the silk, single crochet all around the sweater. 2nd ROW: Picot Edge: * Make 1 s c into the next 4 sts; ch 4; slip st back into the first chain, repeat from * all around sweater. Finish the cuff of the sleeve the same way.
BOOTIES: Instep and Sole: Using the #3 bone hook, chain 10 sts. Make 1 s c into 2nd st from hook and in each of the remaining 8 sts. Ch 1, turn. Work 1 s c into each stitch. Work 7 rows more of s c. Chain 31 sts; join with a slip st to corner of instep. Make 9 s c along side of instep; 9 s c across toe; 9 s c along 2nd side of instep and 1 s c into each of the 31-chain sts, Work 9 rows more of s c into each st. Fasten off and break yarn. Upper part: Tie yarn at center of chain and make 1 d c in each st around (40 d c). Ch 4, turn. Next row: Skip 2 sts, 1 d c in next 2 sts, * 3 d c in next st, 1 d c in next 3 sts, skip 1 st, 1 d c in next 3 sts; repeat from * across row, ending with 1 d c in next 3 sts (5 shells). Ch 4, turn. Next row: Skip 2 sts, 1 d c in next 2 sts, * 3 d c in next st, 1 d c in next 3 sts, skip 2 sts, 1 d c in next 3 sts; repeat from * across row, ending with 3 d c in one st, 1 d c in next 3 sts. Ch 4, turn. Repeat this last row 4 times. Break yarn. Sew up sole and back of bootie. Trim with silk as on the sweater. Run ribbon through the d c row.
BONNET: Using the #3 bone crochet hook: Chain 4 sts; join with a slip st, to form a ring. 6 s c into the ring. 2nd round: 2 s c into each stitch. (12 sts). Mark the beginning of the round with a colored thread, so as to keep it even. 3rd round: * 1 s c in next st; 2 s c in next st; repeat from * around once. 4th round: * 1 s c in next 2 sts; 2 s c in next st; repeat from * around once. Having 1 more stitch between each increase, keep increasing 6 sts on a round until you have 12 sts between each increase (84 sts). Ch 3 sts, turn.
ROW 1: Make 1 d c in next 68 sts; chain 3, turn. ROW 2: Make 1 d c into each stitch picking up the back loop only across row. Chain 3, turn. Repeat Row 2 until the piece measures 4 inches from the back of the bonnet (edge of last s c row). FRONT FRILL: Chain 3 sts; 1 d c in next st; 3 d c in next st; 1 d c in next 2 sts, * skip 2 sts; 1 d c in next 2 sts; 3 d c in next st; 1 d c in next 2 sts, repeat from * 8 times more. NEXT ROW: Ch 3, turn, skip 2 sts; 1 d c in next st; 5 d c in next st; 1 d c in next 2 sts; * skip 2 sts; 1 d c in next 2 sts; 5 d c in next st; 1 d c in next 2 sts; repeat from * across. NEXT ROW: Ch 3, turn; skip 2 sts; 1 d c in next 2 sts; 5 d c in next st; 1 d c in next 3 sts; * skip 2 sts; 1 d c in next 3 sts; 5 d c in next st; 1 d c in next 3 sts; repeat from * across row. Break yarn.
NECK BAND: S c along one side front, across back sts and across 2nd front. Make 3 rows of s c into each stitch. Break yarn. Trim with the silk as the sweater on the frill of the bonnet.